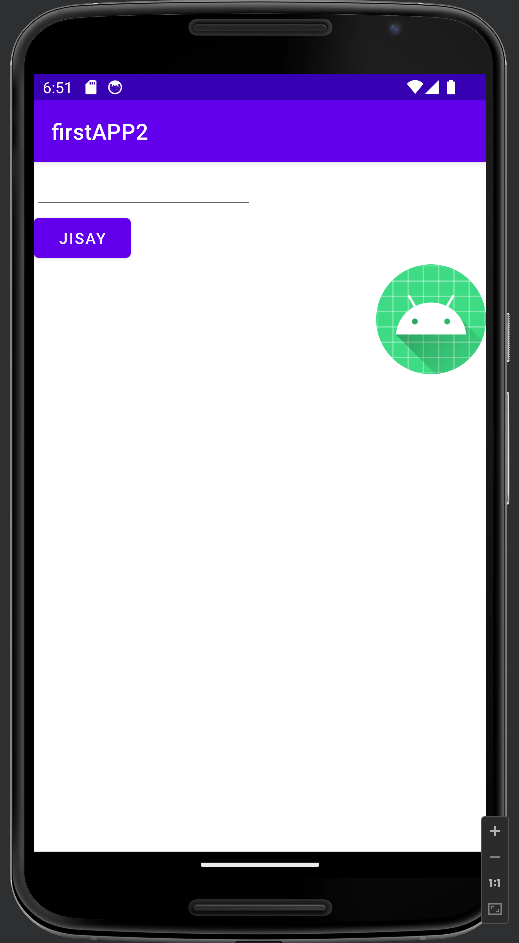
앱 화면에서 사진을 출력하는 걸 보겠습니다.
ImageView
activity_main.xml
<?xml version="1.0" encoding="utf-8"?>
<LinearLayout
        xmlns:android="http://schemas.android.com/apk/res/android"
        xmlns:tools="http://schemas.android.com/tools"
        xmlns:app="http://schemas.android.com/apk/res-auto"
        android:layout_width="match_parent"
        android:layout_height="match_parent"
        android:orientation="vertical"
        tools:context=".MainActivity">

    <EditText
            android:id="@+id/et_test"
            android:layout_width="200dp"
            android:layout_height="wrap_content">
    </EditText>

    <Button
            android:id="@+id/btn_move"
            android:layout_width="wrap_content"
            android:layout_height="wrap_content"
            android:text="이동"/>

    <LinearLayout
            android:layout_width="match_parent"
            android:layout_height="wrap_content"
            android:gravity="right">

        <ImageView
                android:id="@+id/test"
                android:layout_width="100dp"
                android:layout_height="100dp"
                android:src="@mipmap/ic_launcher"/>
    </LinearLayout>
</LinearLayout>
레이아웃 안에 새로 <LinearLayout>을 만들고 그 안에 <ImageView>를 통해서 src 경로에 있는 사진을 화면에 출력합니다.
이때 경로는 main하위에 res폴더가 기본 경로입니다. 예제에서는 기본 폴더에 기본 사진을 썼습니다.
그리고 gravity가 처음 보이는데 레이아웃안에 요소를 좌측, 중앙, 우측으로 출력합니다.
package com.example.firstapp2;

import android.content.Intent;
import android.view.View;
import android.widget.Button;
import android.widget.EditText;
import android.widget.ImageView;
import android.widget.Toast;
import androidx.appcompat.app.AppCompatActivity;
import android.os.Bundle;

public class MainActivity extends AppCompatActivity {

    private Button btn_move;
    private EditText et_test;
    private ImageView test; //ImageView 선언

    @Override
    protected void onCreate(Bundle savedInstanceState) {
        super.onCreate(savedInstanceState);
        setContentView(R.layout.activity_main);

        et_test = findViewById(R.id.et_test);

        btn_move = findViewById(R.id.btn_move);

        btn_move.setOnClickListener(new View.OnClickListener() {

            @Override
            public void onClick(View v) {
                Intent intent = new Intent(MainActivity.this, SubActivity.class);
                String str = et_test.getText().toString();
                intent.putExtra("str",str);
             startActivity(intent);
            }
        });


        test = findViewById(R.id.test);
        test.setOnClickListener(new View.OnClickListener() {

            @Override
            public void onClick(View v) {
                Toast.makeText(getApplicationContext(), "jisay~~~~~", Toast.LENGTH_SHORT).show();
            }
        });

    }
}
script의 alert() 처럼 안드로이드엔 Toast란게 있는데 이미지를 누르면 간단한 메세지가 나오도록 하겠습니다.
ImageView 선언하고 이벤트를 걸고 Toast.makeText()를 통해서 출력할 메세지와 얼마나 메세지를 띄울 지 정할 수 있습니다.
이렇게 사진이 화면 우측에 위치하고 눌리면 메세지가 나오는 걸 확인할 수 있습니다.
AndroidManifest
프로젝트 생성시 AndroidManifest파일을 자동으로 만드는데 AndroidManifest는 Android Application의 기본 구성 및 동작을 정의하는 xml입니다. 앱의 모든 구성 요소 및 권한을 설명하며, 시스템이 앱을 실행할 때 필요한 정보를 제공합니다.
<?xml version="1.0" encoding="utf-8"?>
<manifest xmlns:android="http://schemas.android.com/apk/res/android"
          xmlns:tools="http://schemas.android.com/tools">

    <application
            android:allowBackup="true"
            android:dataExtractionRules="@xml/data_extraction_rules"
            android:fullBackupContent="@xml/backup_rules"
            android:icon="@mipmap/ic_launcher"
            android:label="@string/app_name"
            android:supportsRtl="true"
            android:theme="@style/Theme.FirstAPP2"
            tools:targetApi="31">
        <activity
                android:name=".SubActivity"
                android:exported="false"/>
        <activity
                android:name=".MainActivity"
                android:exported="true">
            <intent-filter>
                <action android:name="android.intent.action.MAIN"/>

                <category android:name="android.intent.category.LAUNCHER"/>
            </intent-filter>
        </activity>
    </application>

</manifest>
<application>의 정의들을 설명하자면
- android:allowBackup="true": 이 속성은 앱의 데이터를 백업할 수 있도록 허용합니다.
- android:dataExtractionRules="@xml/data_extraction_rules": 데이터 추출 규칙을 정의하는 XML 파일의 위치를 지정합니다.
- android:fullBackupContent="@xml/backup_rules": 전체 백업 콘텐츠를 정의하는 XML 파일의 위치를 지정합니다.
- android:icon="@mipmap/ic_launcher": 앱 아이콘 이미지의 위치를 지정합니다.
- android:label="@string/app_name": 앱 이름 또는 라벨을 지정합니다.
- android:supportsRtl="true": 오른쪽에서 왼쪽(RTL) 언어를 지원하도록 설정합니다.
- android:theme="@style/Theme.FirstAPP2": 앱의 테마를 지정합니다.
- tools:targetApi="31": 도구 속성으로, 이 코드가 Android API 레벨 31에 대해 타겟팅되도록 설정합니다.
<activity>나 <Intent>는 새 액티비티를 생성하거나 Intent 객체를 생성면 자동으로 작성되기 때문에 직접 작성할 필요없습니다. 직접 수정해야할 필요가 있을 때 일부 설정에 대해선 수동 설정이 필요할 수도 있습니다.
Values
res 폴더 하위에 values 폴더가 있는데 colors.xml, strings.xml, theme.xml 세개의 파일이 있습니다.
주로 values는 코드가 길어질 때 공통적인 부분을 정의해서 코드의 재사용성을 높이기 위한 존재입니다.
간단한 예로 보자면
<resources>
    <string name="app_name">firstAPP2</string>
    <string name="js">jisay</string>
</resources>
strrings.xml파일에 js라는 이름으로 호출할 때 jisay가 리턴되도록 정의합니다.
<Button
            android:id="@+id/btn_move"
            android:layout_width="wrap_content"
            android:layout_height="wrap_content"
            android:text="@string/js"/>
호출하는 방법은 @xml파일 / 정의한 이름 이런 식으로 호출하면

버튼에 JISAY가 출력되는 걸 볼 수 있습니다.
'Android Studio' 카테고리의 다른 글
| [Android Studio] 첫 안드로이드 앱 개발 시작해보기 - WebView, Navigation Menu (7) (1) | 2023.11.02 |
|---|---|
| [Android Studio] 첫 안드로이드 앱 개발 시작해보기 - LIstView, SharedPreferences (6) (1) | 2023.11.01 |
| [Android Studio] 첫 안드로이드 앱 개발 시작해보기 - Intent (4) (0) | 2023.10.31 |
| [Android Studio] 첫 안드로이드 앱 개발 시작해보기 - EditText, Button (3) (0) | 2023.10.29 |
| [Android Studio] 첫 안드로이드 앱 개발 시작해보기 - 가상 기기 (2) (0) | 2023.10.29 |


